|
|
              |
THE AIRTIME STANDARDS OF MEASUREMENT (ASM) copyright 2000 1. MANDATORY MEASUREMENTS. There are many ways to jump, and many ways to measure jumps. In this brief explanation of how jumps are measured, we will address a standard ramp to ramp jump. There are three measurements that are handy to have on typical jumps, and that is, in order of importance, 1) Ramp gap, 2) Total jump distance, and 3) Clear gap. a. RAMP GAP. The ramp gap is the horizontal measurement from the high end of the launch ramp to the beginning of the downside of the landing ramp. RAMP GAP
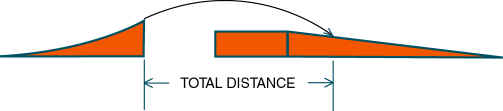
The protective apron is considered "invisible" and is only there to save the rider's life if he comes up short, as he surely will from time to time. If he comes up short, he can land on the protective apron. If he lands on the protective apron, it's a hard landing, but he can ride it out. It's possible that he will crash. Again, it's there to save his life if he comes up short. b. TOTAL JUMP DISTANCE. When a motorcycle lands on a landing ramp, it leaves a mark. That mark is oval shaped. We want to find the edge of the oval mark that is closest to the launch ramp. The total jump distance is measured from the top of the launch ramp to the point on the oval shaped tire mark closest to the launch ramp. TOTAL JUMP DISTANCE
Some individuals watching a jump will mistakenly think a jumper is jumping farther than he is. That is because the motorcycle has two wheels and some jumpers have a difficult time keeping the front end down. Usually, when the rear wheel hits the landing ramp, the rider has made the mark the jump will be measured on. However, the front end is still in the air. It slaps down. That is where untrained bystanders sometimes think the landing happened, which, at that speed, could be 25 feet farther down the ramp. Essentially, the jump is measured just like long jumping in track & field; it's measured to the nearest mark. It doesn't matter which tire lands first to leave the nearest mark, or if it's the jumper's body that lands closest to the launch ramp. That's the measurement. Sometimes the mark is hard to see. It's the distance judge's call to pick the exact edge of the mark and if there is no mark, to see the exact spot where the rider landed. c. CLEAR GAP. The clear gap is the gap between the launch ramp and the protective apron; the gap where there's nothing to save the rider. CLEAR GAP
The clear gap can be quite small when a jumper doesn't use a speedometer and has to construct a large protective apron. 2. MEASUREMENT TECHNIQUES. a. THE DOUBLE STRETCH METHOD. A good technique for measuring a jump is to first measure the clear gap and ramp gap along the ground, then the rider jumps. Then measure from the top edge of the landing ramp, down the landing ramp to the nearest edge of the nearest mark. Add this measurement to the ramp gap to get the total jump distance. This is usually the preferred method. b. THE SINGLE STRETCH METHOD. This is primarily for ramp to ground jumping. It has been used before through the air on a few ramp to dirt ramp jumps, but should be avoided for that purpose, especially when the tape has to be stretched at an angle across the ramp gap. c. MARKS TRANSFERRED TO THE GROUND. When using a dirt landing ramp, it's hard to measure the ramp gap along the ground. Sometimes the landing ramp isn't built to the marks that were laid out in advance, so after the landing ramp is built, the location of the high end of the landing ramp has to be determined and transferred PROPERLY to the ground for ramp gap measurements. On top of the landing ramp, there should be a mark showing the top edge of the landing ramp, and when the rider lands, the jump should be measured from the ramp gap mark down to the nearest edge of the tire mark, and the two should be added together for the total jump distance. d. SURVEYING EQUIPMENT. Rarely, it's too difficult to use a tape measure, and surveying equipment can make it possible to get a good measurement. e. MEASURING RAMP TO DIRT RAMP JUMPS. The following methods should be used to measure ramp to dirt ramp jumps, since it's impossible to measure between the ramps along the ground. This will ensure accurate measurements of ramp gap, total jump distance and clear gap. Measuring Ramp Gap on a Ramp to
Dirt Ramp Setup Tools and materials required: 300’ tape measure, two 10’ pieces of ¾”
PVC, hacksaw or PVC cutter, mason’s stringline, upside down paint, 3 pound
hammer, Sharpie marker, 12” piece of 1 ½” angle iron if ramps are on dirt,
or chalk to mark pavement. Step 1: Determine ramp centerline going through both ramps. Actually, it's
best to work with one “reference edge” of the launch ramp, along one side of
the ramp, to make a line through both ramps. To do this, stand on the high end of the landing ramp, looking over the
entire safety deck, and sight along one edge of the launch ramp with one eye.
Where the sight line hits the high end of the landing ramp (the safety
deck/landing ramp juncture), pound a piece of PVC vertically into the dirt
with one side edge lining up with the edge of the launch ramp. This PVC should
protrude about two feet above ground. Then, where the sight line hits the gapward end of the safety deck, pound a
piece of PVC vertically into the safety deck with one side edge lining up with
the edge of the launch ramp. This PVC should be longer than the first so
it can be seen from the bottom of the landing ramp. Four feet tall should be
sufficient. Next, go to the flat ground at the bottom of the landing ramp and sight
across the same side edge of the two pieces of PVC. Pound another piece of PVC vertically into the ground, or make a mark on the pavement, with one side edge
of the PVC aligning with the same side edges of the two pieces of PVC at the top of the
landing ramp and on the safety deck. Now you’ve got an imaginary line along one side of the launch ramp, through
the entire landing ramp, that is parallel with the ramp centerline. You will
work off of this line to do the following steps.
To do this, start from the reference edge of the launch ramp, on the ground
at the high end of the launch ramp. Measure 90 degrees from the reference edge
of the launch ramp, all the way to a point where you’ll be able to continue
the offset ramp centerline around the landing ramp. For example, let’s say you
have to measure 75 feet to the side to clear the dirt landing ramp apron, which
is the angled side of the landing ramp. The objective is to get to flat ground
next to the landing ramp to measure the ramp gap along level ground. When
you’ve measured the offset from the launch ramp, pound a two foot long PVC
pipe vertically into the ground with one side edge on the measurement. Next, using the same measurement you used to offset from the launch ramp’s
reference edge, measure 90 degrees from the reference edge of the PVC
that is located at the bottom of the landing ramp. Pound another two foot PVC vertically into the ground with one side edge on the offset measurement. Now you’ve got two marks or PVC pipes that represent an imaginary line that
is parallel to the ramp centerline. This imaginary line will be used to measure
the ramp gap and to ascertain the exact position of the landing ramp relative to
the launch ramp. These two pipes might be 300 feet apart, so you can’t pull a stringline
between them and expect it to be straight. However, you can still have a
stringline that is pulled straight along the offset ramp centerline. To do this, sight across the two reference side edges of the two PVC pipes
while a helper positions two more PVC pipes adjacent to the approximate location
of the high end of the landing ramp, about 20 feet apart. These two PVC pipes
must have one side edge exactly aligned with the offset ramp centerline. As you
sight across the reference edge of the pipes, call out to the helper to tell him
which way to position the new pipe. When it’s right, have him pound it into
the ground. Then move toward that pipe and sight the next pipe in until it’s
aligned, then have him pound that one into the ground. Next, wrap a stringline around the two pipes so the string is an inch above
the ground and pulled tightly along the reference side edge of both pipes. The
string must be pulled along the offset ramp centerline, or parallel with it.
This string is the tool that will precisely locate the landing ramp’s position
relative to the launch ramp on the offset ramp centerline.
To do this, pull the mason’s stringline across the reference corner at the
gapward end of the launch ramp to the offset ramp centerline. The next step is
to position the stringline so it is precisely square to the reference edge
corner of the launch ramp. To do this, use the 3-4-5 rule. To do this, first measure 30 feet along the ground, along the reference edge
from the reference edge corner, back toward the low end of the launch ramp. Make
a mark on the ground, pound a nail into the ground or otherwise make a small
mark because accuracy is paramount. A fat mark will leave too much room for
error. Next, measure 40 feet along the string from the reference edge corner of the
launch ramp toward the offset ramp centerline. Make a small mark on the string
with a Sharpie at 40 feet. The next step will make the string square to the reference edge, exactly 90
degrees to it. This is important to get an accurate ramp gap later. Measure from the 30 foot mark to the 40 foot mark along the ground,
diagonally. Adjust the position of the string where it crosses the offset ramp
centerline until your third measurement is 50 feet exactly. Pound a two foot long piece of PVC into the ground with one side edge holding
the string in perfect position to keep it square, and the adjacent side edge of
the PVC aligned with the offset ramp centerline. Now you have the position of the launch ramp marked on the offset ramp
centerline.
To do this, first go to the high end of the landing ramp, to the safety
deck/landing ramp juncture, and mark the exact spot where the landing ramp
begins. This might require sighting across the landing ramp from the side on the
ground – sometimes it’s hard to ascertain where the safety deck ends and the
landing ramp begins, due to radiused or rounded transitions from safety deck to
landing ramp. Once you make that mark, pull a string across the top of the
landing ramp, perpendicular to the ramp centerline, to show where the deck/ramp
juncture is officially located. Pound a short piece of PVC into the ground on
each side and tie the string between them. Sometimes a mark can be made along
the ground. Next, where the string meets the side edge of the landing ramp, there should
be a berm along the edge where the heavy equipment was working. Knock this berm
off where the string meets the edge of the landing ramp so you have a clear shot
from the PVC’s base (the piece of PVC that holds the string across the top of
the landing ramp) to the stringline that is pulled along the offset ramp
centerline. The next thing you’ll do is determine the exact position of the
landing ramp relative to the launch ramp along the offset ramp centerline. To do this, slide the round ring on the end of the 300 foot tape measure over
the PVC pipe that is on the offset side of the landing ramp and pull the tape
diagonally through the air across the stringline that represents the offset ramp
centerline. Pull the tape tightly – you’ll feel a certain tension that is
consistent. Maintain the same tension on the tape throughout the following
procedure. Swing an arc with the tape across the stringline. You’ll notice that the
measurement changes as you swing the arc. You want to find the shortest
measurement, but simply doing that is not precise enough. You want greater
precision in determining where to place the mark that shows the position of the
landing ramp. To do this, swing the tape along the string to a longer measurement. Be very
precise and work off of one hash mark. This is the reference hash mark. Swinging
the tape through an arc, you’ll see exactly where your reference hash mark
crosses the string on your left as you face the side of the landing ramp. Mark
this spot on the string. Then swing the tape measure to the right and ascertain
where that same reference hash mark crosses the string again on your right. Mark
the string at that location. Now you’ve got two marks on the string, two or three feet apart. Split the
difference and make a mark centered between the two. That is exactly where the
landing ramp is positioned relative to the launch ramp on the offset ramp
centerline! Pound a piece of angle iron into the ground, or make a mark on the pavement,
representing the position of the landing ramp, right at the stringline. One edge
of the angle iron should be aligned with the offset ramp centerline. Another
adjacent edge should be aligned with the landing ramp’s position. Everything is measured off of this landing ramp position. It is the zero mark
in determining ramp gap. You will measure from this mark, toward the launch
ramp, to determine ramp gap. Step 5: Measure along the offset ramp centerline from the landing ramp mark,
or Zero, to the mark representing the position of the launch ramp. That's the
current ramp gap. Go to the launch ramp and paint the current ramp gap number,
in feet and inches, on the ground (or mark pavement with chalk), and mark the
ground where the launch ramp is currently positioned. For example, let’s say
that measurement is 153 feet, 7 inches.
When the ramp is moved back to the new ramp gap, it is stopped on the hash
mark. Continue making hash marks and putting numbers on the ground until you
arrive at the maximum anticipated ramp gap. These marks are placed next to the
ramp so the ramp doesn’t obliterate them as it’s dragged along the ground.
On pavement, you can paint these marks before you ever position the launch ramp.
Step 8: There are three measurements that are required: ramp gap, total jump
distance and clear gap. Vertical height measurements are not covered here. You’ve measured the ramp gap and you’ve measured total jump distance, but
you also need clear gap because that could be a world record when the other two
are not.
3. PROCEDURES FOR RECORD JUMP ATTEMPTS. When a jumper is attempting a record jump, certain procedures should be performed. It's in the best interest of the jumper to properly document his attempt when he is breaking a record. Other jumpers should be there if possible. They can't always be there, but they can credibly witness the distance measurements. The distance judge should know the Airtime Standards of Measurement (ASM) and be familiar with the ATA Category list to measure the jump. He should measure according to the ASM. Reliable witnesses should watch the measurement process. Reliable witnesses means several things. They shouldn't be managers or relatives. They should have experience jumping or measuring jumps. They should know the ASM and be familiar with the ATA Categories. Videotaping the measurement process from one end to the other is recommended. At every record attempt, someone has a video camera that can properly capture the measurement of the jump. Shots should be taken that show the point of impact on the landing ramp, and shots of the jump should be taken from the side view to the entire obstacle, including at least the ends of the ramps, shot from far away. Jumpers should try to have one master photo of the jump that shows the entire obstacle from the side, shot from far away and including the ends of both ramps, with the rider jumping over the obstacle. If possible, it should be shot with a "normal" lens, 50mm. This keeps it looking normal, not wide angle, which distorts the shot, making the gap appear larger. Sometimes this is not possible. 4. OFFICIALS. a. OFFICIALS CERTIFIED TO MEASURE JUMPS. ATA-appointed and licensed officials trained in the proper measurement and documentation of jumps should be present to verify all claims with established procedures outlined in the Airtime Standards of Measurement. These officials must understand the ASM and the ATA Categories prior to the jump and should have the printed versions on hand for judging record attempts. These officials should be card-carrying members in good standing, licensed by the ATA to officially measure and document jumps. The ATA offers quick licenses to individuals in the event that it is economically unfeasible for other ATA judges to travel to the location. See "Adequate Notice" rule. Only one official, the distance judge, is necessary to officially measure the jump all three ways (clear gap, ramp gap and total distance), but it is better to have more than one. The witnesses who are with the head official, or distance judge, are important officials for verifying the actual jump distance. Relatives and managers of the jumper are not permitted to officially measure or witness record jumps. As soon as possible following the jump, the ramp gap, total jump distance and clear gap should be announced by the head ATA official. After the proof of jump distance is submitted to the ATA, the records will be updated to reflect the official record holders in all categories. b. DUTIES OF THE DISTANCE JUDGE. The Distance Judge decides where the mark is and where the measurement should be taken from. He brings the primary tape measure to measure the jump. He measures the jump, or oversees the measurement to make sure everything is proper. He compares the tape measure to another when appropriate. He announces the official measurement. He documents ramp gap, total jump distance and clear gap. To judge the distance, he should stand relatively near the landing ramp and to the side, but far enough ahead of the landing ramp's center to see the entire surface of the landing ramp. This gives him a good angle to see the landing clearly and ascertain the measurable mark left by the motorcycle. He should conduct a meeting with the witnesses and explain the ASM. He should do a walk-through if necessary to make sure the witnesses understand exactly how the jump is being measured. The distance judge has final say on the distance. He should document the names of the witnesses who were present to verify the measurements. He should document the obstacle jumped, the ATA category, date, time, location, venue and event name. See World Record Motorcycle Jump Submission Form. c. DUTIES OF THE OFFICIAL WITNESSES. The official witnesses should be present and accounted for before, during and after the jump. They should be in contact with the Distance Judge or Head Official. Their names, phone numbers and addresses should be submitted to the ATA as official witnesses. They should attend a meeting conducted by the Distance Judge to learn about the ASM and do a walk-through of the measurement process to understand exactly how the jump is to be measured. They should know the three measurements that have to be taken. They should know that the Distance Judge has final say on the actual jump distance. They should be present to witness the jump attempt, positioned near the Distance Judge. 5. TOOLS OF MEASUREMENT The preferred tool of measurement for record jumps at this time is a 300' fiberglass measuring tape. This is a tool that is available to all jumpers. It should be inspected for splicing and, if possible, compared to another 300' tape measure for accuracy. Ramps are sometimes set up using rolling wheel style tape measures. They are considerably accurate. If the ground is very level and smooth, a rolling wheel tape measure can deliver reasonably accurate results for setting up. For official measurement, however, a 300' tape measure should be used. Measuring ramp to ramp jump distances and heights can be tricky. Surveying equipment is beyond the scope of most jumpers. Therefore, it is not to be used in measuring jumps. The most acceptable way to measure one jump might not apply to others, and apples need to be compared to apples. It has to be reasonably easy to measure jumps. Measurements should be standardized for the type of jump being performed. 6. FAILED ATTEMPTS. When a jumper crashes due to failure to perform the jump properly, such as looping out, then the jump distance doesn't count. The jump is then considered a failed attempt and is not to be considered for record status. When a jumper lands out of control, or lands hard and crashes as a result of rider error, the jump doesn't count. 7. SUCCESSFUL ATTEMPTS WITH CRASHES. If the jumper was in control of the jump and landing, the jump was successful. Mechanical failures are sometimes hard to predict in the high impact world of motorcycle jumping. If a rider crashes due to rider error, the jump doesn't count. If a rider crashes due to mechanical failure, the jump might count - if rider error didn't cause the mechanical failure. In the case of a crash, an explanation will accompany the ATA certificate of jump distance. 8. CERTIFICATION OF JUMP RECORD. A jumper will be awarded a certificate by the ATA with the official logo of the ATA, the category and division of the record, the certifying official's name and signature, the jumper's name, the location, facility, event name and the date of the achievement. This certificate is proof that he jumped the distance claimed. The ATA will maintain records of who is a record holder, and records will be updated regularly. 9. ADEQUATE NOTICE. A jumper attempting a world record must give ample notice to the ATA so that qualified judges can be scheduled to travel to the location to witness the attempt. It is the jumper's responsibility to pay for travel of the judge(s), including fuel, airfare, taxi, hotel and per diem, if necessary. It is not the judges' responsibility to pay their own way, although they may if they wish. A minimum of five licensed ATA members should be invited to certify that the jump is real, read the tape measure and measure with their own tape measures if they would like. This invitation can be extended through the message board at www.johnnyairtime.com. 10. VIDEO OR FILM. Any jump should be videotaped or filmed to provide a visual record of the jump. Videotape, chemical process film, digital image or other live-action, commonly used video and audio recording and playback device should be used. The measurement of the jump should also be recorded. The purpose of this is to give adequate proof of the jump distances. 11. INSURANCE. Each jumper provides his own health insurance. ATA does not take any responsibility for the jumper's actions, or liability for the jumper under any circumstances. The ATA is simply there to properly document the jump and to measure the jump as carefully as possible. 12. RAMP DESIGN. The jumper, crew chief or ramp master must show that the ramp design is proper to support the motorcycle at the speed and forces planned. A weak design could lead to a very unsafe condition, and the ATA might be able to detect an unsafe ramp design or defect. Many jumpers have risked getting hurt jumping ramps that are not up to the task. ATA officials have the right to leave if the setup is obviously suicidal. 13. RAMP CORRIDOR AND RAMP MARKINGS. These are guidelines and do not have to be followed to the letter. a. RAMP CORRIDOR. The ramp corridor should be properly secured to prevent people from walking, riding or driving across the jumper's path. This is the sole responsibility of the jumper and his team, not the ATA. The area around the rider's path approaching the launch ramp, called the acceleration zone, should have a dashed line visible to the rider painted or otherwise applied on the ramp centerline leading up to the launch ramp, beginning at least 200 feet before the launch ramp and going under the launch ramp and beyond it. This line guides the jumper as he approaches the launch ramp and gets him completely accurate side to side. It also provides a reference mark to center the launch ramp on when setting the ramps up. The location of the launch ramp and landing ramp legs should be painted or otherwise marked on the ground, right around the edges of the legs. The acceleration area should be prepared for maximum traction, and the braking area should be also. If minimum braking space is a concern, at least one wall of hay bales should be constructed, fire extinguishers should be on hand and any solid objects such as walls or pillars, poles or trees should be covered with hay bales or other impact attenuators. b. LAUNCH RAMP. The launch ramp should have a line or stripe up the center 4 inches wide. This line or stripe can be solid black on a white background or a visibly contrasting section of any colors resembling a line going through words, logos or art. This guides the jumper all the way off the ramp. It should be easy to see and visible from the bottom of the ramp to the top. The surface of the ramp should be painted with sand paint. c. LANDING RAMP. In the interest of accurately determining distance, the landing ramp can be painted white before the real jump or jumps so that no previous marks are on the ramp. Then when the jumper lands, the mark stands alone on the ramp. This eliminates confusion due to a ramp with tire marks all over it. It is okay to have several marks on the ramp, but it is not advisable to have many. Steps should be taken so it is easy for the distance judge to pick out the exact mark where the landing occurs. It is a good idea to paint out new marks or mark them to show they've been documented. A quick-drying paint or primer should be used. Brands like KILZ are acceptable and the entire ramp can be painted and will dry in about 30 minutes in a relatively dry climate. Spots can be painted one at a time and will dry more quickly than an entire ramp paint job. Some paints dry in 5 minutes. c. PROTECTIVE APRON. It is mandatory to use a protective apron when jumping ramp to ramp. Jumpers attempting a jump without a protective apron risk being barred from the ATA and the judges reserve the right to not measure the jump and to leave the location. Some exceptions will apply. Contact the ATA for advice prior to setting up.
|
| Keep up with the latest by reading the Air Times! Measure your record jumps using the ASM (Airtime Standards of Measurement)! Look at ATA Record Categories for where your record jump fits! Visit the Ramp to Ramp Motorcycle Jumping Message Board! |